Google Home to Control Wireless Power Outlets

This is version 2 for my guide on how to control cheap wireless power outlets using a Google Home and a Raspberry Pi. This guide is a much better method than my first attempt using IFTT. This tutorial assumes you already setup the outlets.
Related Tutorials
Currently the Google Home does not support controlling devices within your network if they are not a supported device. Luckily for us a great open source project called ha-bridge solves this issue. Ha-bridge works by emulating the Philips Hue api to other home automation gateways such as an Amazon Echo or Google Home. It can handle basic commands such as “On”, “Off” and “brightness”. It’s pretty amazing how they were able to reverse engineer the hue api. Ha-bridge is primarily written in Java and has a web interface.
- If you haven’t already be sure to follow my guide on setting up the cheap wireless power outlets to work with a raspberry pi.
- Login to your raspberry pi terminal and create a directory for ha-bridge
mkdir habridge
&&cd habridge/ - Download jar file for ha-bridge (Latest release)
wget https://github.com/bwssytems/ha-bridge/releases/download/v3.5.1/ha-bridge-3.5.1.jar
- Install java and wait….
sudo apt-get update && sudo apt-get install oracle-java8-jdk
- Run the jar executable
sudo java -jar -Dserver.port=80 ha-bridge-3.5.1.jar
- Port 80 is required for the Home to discover ha-bridge, so if you get an error message like: “java.net.BindException: Address already in use“, then you need to change whatever is using port 80 to something else. If you are running apache, follow these steps.
- In a web browser, go to your Pi’s local IP address, for example
http://192.168.1.11:80. You should now see the ha-bridge gui interface. - Click on Manual Add and follow the example below. When choosing Execute Script/Program, the program path needs to in the On Url/Off Url input
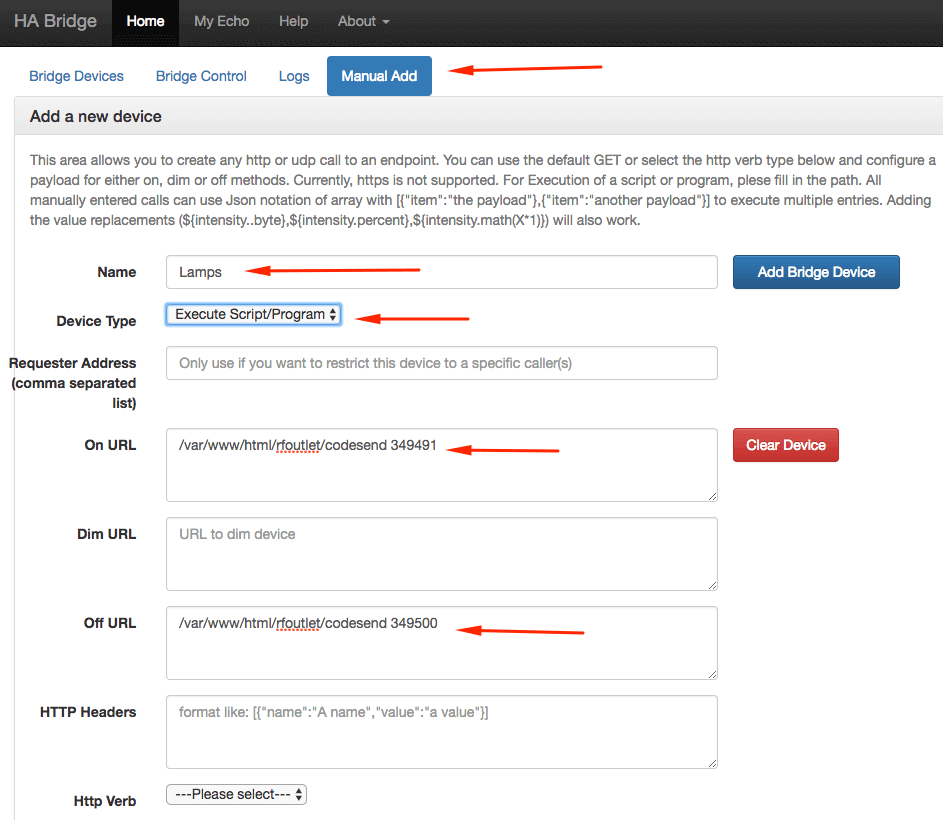
- Be sure to use your outlet codes and add the device
- You should now be able to test turning the outlets on/off from the gui interface.
- If the outlets work, open up the Google Home app on your mobile device. Go to Home Control and click the plus icon. Choose Philips Hue and wait for it to discover your Raspberry Pi running ha-bridge.
- You should now be able to tell your Home to turn on or off the lamps.
If you would like to have ha-bridge start automatically, follow my guide to setup Systemctl. Below is my service config to start ha-bridge.
[Unit] Description=HA BridgeWants=network.target After=syslog.target network-online.target
[Service] Type=simple ExecStart=/usr/bin/java -jar -Dserver.port=80 /home/pi/habridge/ha-bridge-3.5.1.jar Restart=on-failure RestartSec=10 KillMode=process
[Install] WantedBy=multi-user.target
Please let me know in the comments below if you have any questions or feedback.